
How to build a Rope Heater
Rope Heater, by Philip Kinsman from All Saints, Wrington
This time of year bell rope ends are often damp and stiff from hanging in an unheated ringing chamber. This makes the ropes more hazardous and harder to manipulate skilfully. Heaters have been around for some time, to deal with this problem, but often tower members have hesitated to make them due to the time involved, and a shortage of storage space in the ringing chamber once ringing commences.
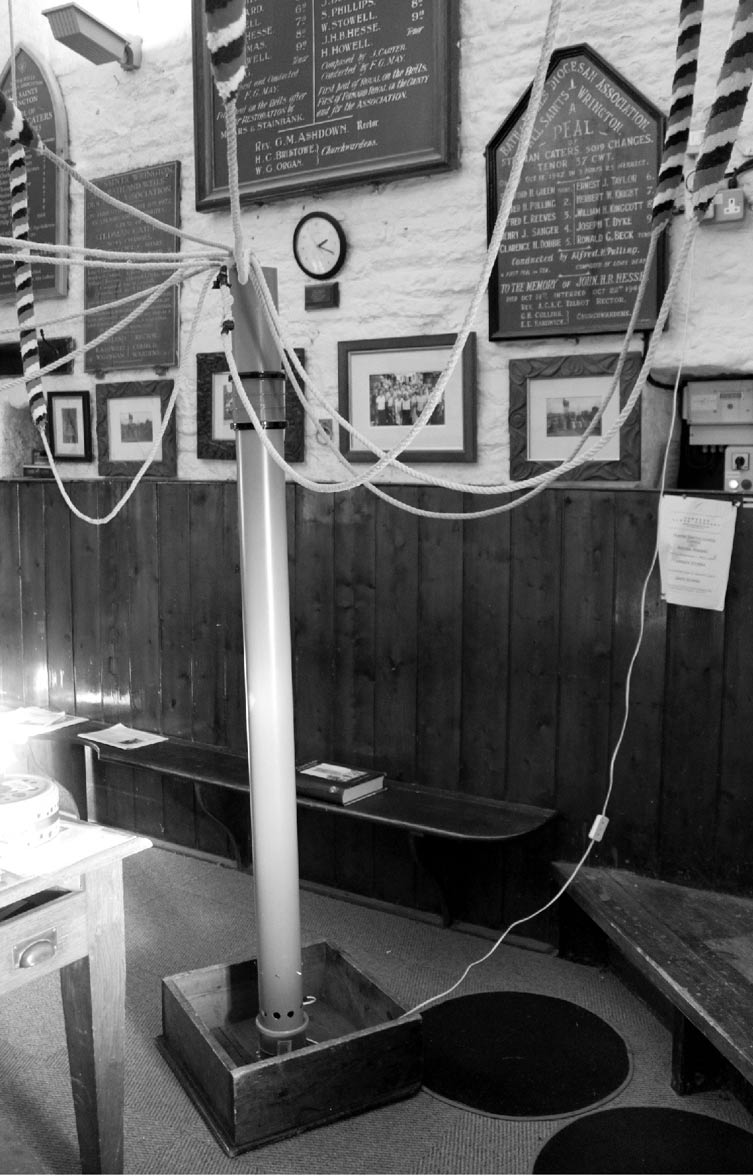 In response to this I have come up with the following design, that is low cost and is quick to make. The base is made from an inverted ringing box, that doubles up as an aid for shorter ringers while ringing is taking place. During ringing the heating tube can be stood/hung in the corner of the chamber, occupying the minimum amount of space. If you want you can drill a 25mm hole in the side of the top of the soil pipe and hang it on a coat hanger.
Having floated this design through our discussion group in the Bath & Wells diocese, I have incorporated suggestions made by a number of correspondents, and would like to thank them for their contributions.
Materials: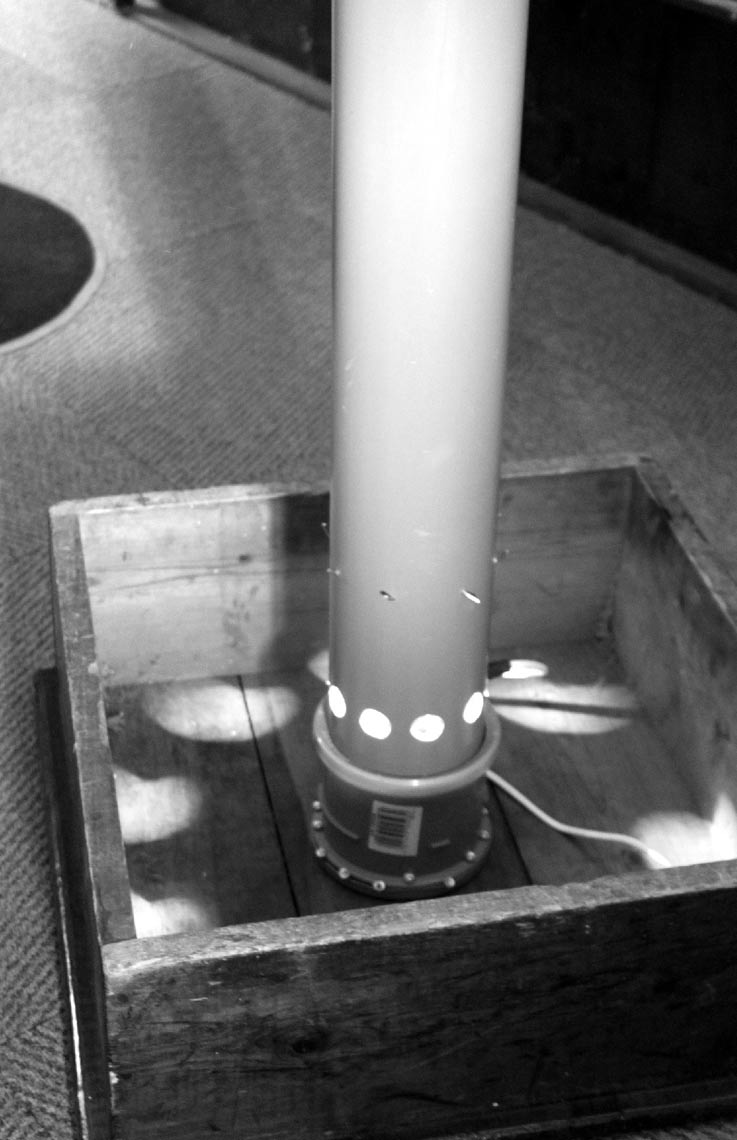
1, 4” (102mm)ID plastic soil pipe, 1920mm long
1, pipe connector to fit
1, B22 Female Base Light Lamp Socket (£2 from Amazon.com) Do not use the older all-metal designs.
1, 5-10mm Plastic Waterproof Cable Gland
2, 100mm diameter discs of pine or plywood or mdf, 25mm thick
4 Metres of lighting cable with 3 pin plug
2 wire coathangers.
Roll of masking or insulation tape
14, m3.5 30mm screws. 2, 1m5 50mm screw
105mm disk of chicken wire, or wire sieve of the same diameter, minus its frame & handle.
Tools:
Electric drill. Drill bits: 2.5mm, 3mm, 3.2mm, 12mm, 18mm
Hack saw. Jig saw. Wire cutters, Philips screwdriver, pliers. File. Sharp knife.
Method
 Take the pipe connector. With the knife cut into one of the rubber seals inside. Grip the severed end with the pliers and pull it out. Take out the second in the same way. Drill 12 2.5mm holes around the lip of the connector. Using the narrow 30mm screws, attach it to centre of the underside of the box. If the screw points go right through, use shorter screws!
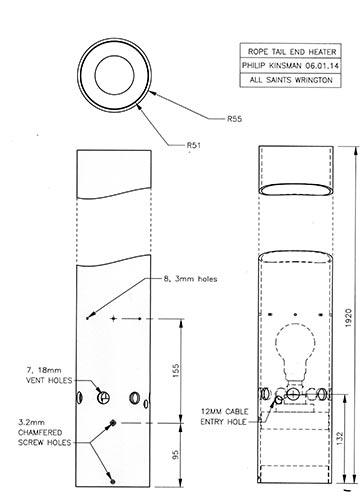
Wrap tape around the soil pipe, 1920mm from the end, to use as a marker for cutting it. Cut with the hacksaw and file smooth. 132mm from the end, wrap round the adhesive tape and drill 7 or 8 18mm holes in the pipe. Between two of these, drill a 12mm hole to take the cable.
250 mm from the end of the pipe, wrap adhesive tape around and mark carefully 8 equally spaced points; drill 8, 3mm holes to take the steel coathanger wire that prevents the rope tail ends from touching the bulb.
Drill a 3.2mm hole 95mm up and chamfer it. This will take the screw that holds the lamp socket in place. Using a jigsaw cut two 100mm diameter discs of pine or plywood, 25mm thick. Make sure they will slide up inside the tube. Near the top edge of one of the disks drill a 12mm hole to take the wire. Also one in the middle. Wire the socket and thread the end down through the middle hole. Knot it to make a cable strain relief and thread it back up through to the top of the wooden disk. Screw the socket to the disk. Put the cable gland into the cable entry hole.
Thread the wire through the gland and out through the cable entry hole. Push the gland into place so it grips the cable and provides strain relief. Plug in the 40 watt* light bulb. Slide the disk and socket and bulb assembly up the tube until you can see the wooden side of the disk through the 3.2mm chamfered hole. Put in the 50mm screw to hold it in place. Look through the ring of 8, 3mm holes to check that the top of the bulb you are using is beneath their level.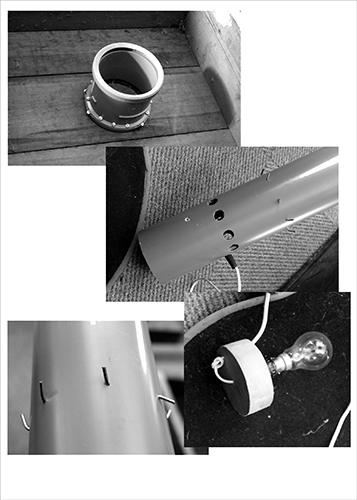
Cut the coathangers to make 150mm straight lengths. With the pliers make a bend 15mm from one end of each of the wires. Thread them through the ring of 3mm holes so they come out at the opposite sides of the pipe. Bend the emerged ends so they stay in place. The last couple may need to be bent a bit so they thread over and under the first two. Then cut a disk of chicken wire – or use a steel mesh wire sieve, so it is slightly bigger than the ID of the soil pipe and push it down so it fits snugly against the 4 bits of coathanger wire. This will prevent any contact between the rope ends and the bulb. Make sure the bulb works by wiring the cable end to a plug. Slide the second disk into the bottom of the soil pipe to provide protection to the cable and double insulate the unit. Fix it into place with a second countersunk screw.
Do not use a bulb of wattage higher that 40, or the pipe will melt. The unit can be run on a timer for a few hours each day and that will be enough. If you use a low energy 11 watt bulb you can leave it running continuously through the winter.
This design should pass any test as it is double insulted and all electrical parts are shrouded in plastic. If you include the risks that arise from using damp stiff tail ends in ringing to your identified Risk Assessments, this may deflect any complaints from your using home-produced electrical equipment in the tower.
Good luck!